

Thursday, November 26, 2009
Blue Boy Puppet
I had a nephew very interested in owning one of my puppets. This started me on the simple idea of just making one of his very own as a gift. I decided to stick with a simple enough character using the Melonhead puppet pattern from Project Puppet. This still gave me the opportunity to test some other simple building techniques. It was the first Project Puppet design that I incorporated using a black sock as a sleeve attached to the inside of the mouth plate. It makes your grip more solid and mouth control easy. I also used pipe cleaners attached to the 'palm plate' to give articulation to the fingers. I'm leaving it up to my nephew to give him a name but I think he kind of looks like a Max or Oswald.

Tuesday, November 24, 2009
Muppet Bohemian Rhapsody
This was just too amazing not to post. The Muppet Bohemiam Rhapsody features 70 Muppets!! For Muppet purists, the voices of Dr. Teeth AND Scooter are sounding pretty spot on. No complaints here. It's a Muppet party of GROOOOOOVY proportions fer sure!
Rock on my Muppet friends. The future is looking bright. I'm stoked!
Rock on my Muppet friends. The future is looking bright. I'm stoked!
Sunday, September 06, 2009
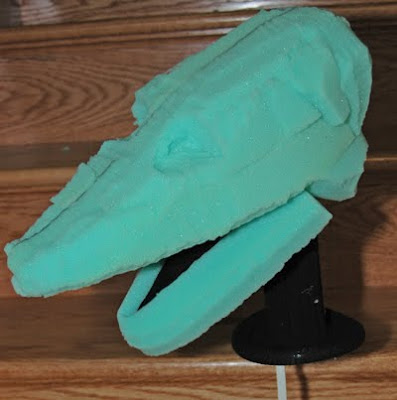
A new beginning and a Russ Walko creation
I recently had a flicker of inspiration and started work on a new puppet. I never know exactly what the puppet will be but, this is intended to be a puppet skull for a dog.
After the passing of one of my idols, Michael Jackson, I thought it would be great to have a puppet likeness of MJ. I didn't have the patience to realize it myself and I really wanted someone to work it that I knew could deliver. Russ Walko is an amazing talent in the puppet building world and he was receptive to working on the project and delivered an amazing puppet. He even looks better in person. Thank you Russ!


After the passing of one of my idols, Michael Jackson, I thought it would be great to have a puppet likeness of MJ. I didn't have the patience to realize it myself and I really wanted someone to work it that I knew could deliver. Russ Walko is an amazing talent in the puppet building world and he was receptive to working on the project and delivered an amazing puppet. He even looks better in person. Thank you Russ!

Saturday, June 27, 2009
Electricity
The video I made of the Ming & Ping puppets has recently debuted as part of the new "Ming & Ping Spicy Show".
Thanks again to my friend and fellow puppeteer Rich Hotaling and Bao, Ming & Ping for making this possible. Keep it Spicy!!
Thanks again to my friend and fellow puppeteer Rich Hotaling and Bao, Ming & Ping for making this possible. Keep it Spicy!!
Friday, June 05, 2009
Ming and Ping - the process
Ming and Ping are one of my favorite synthpop groups - mingping.com. They are twin brothers from Hong Kong presently residing in LA. I was inspired to make these two puppets of them. Ming prefers black and has been known to wear purple make-up while Ping is more into wearing white with blue accents. I was thrilled with the almost 'manga' look of this duo and quickly started plotting an idea to capture them on video.

I chose a catchy, upbeat tune called Electricity from their last album Causeway Army. I enlisted a friend and did a few takes of the 3 minutes tune in no time. Although we had a few interesting ideas, after starting the editing process, it just felt flat. All these other ideas then started to flow. I created a quick storyboard in InDesign and worked out scenarios for at least every count of 16, if not, more. It took me no time and, in another week, I had my fellow puppeteer back to video again. This time it was SO much easier to talk about each shot, set it up and shoot. It felt much more organized and allowed the creativity to flow a bit more. While sitting down to edit this time, I knew I had something and the video looks great for a first time puppet shoot. Obviously, story-boarding is a mainstay in the video/film industry for a reason. The initial time it takes to lay it out is SO worth the feeling of being organized and ready for shooting day... but, even the first disorganized shoot was worth it to help understand what I was going for and where I needed to focus my attention. Enjoy the process folks! ... Video coming soon!

I chose a catchy, upbeat tune called Electricity from their last album Causeway Army. I enlisted a friend and did a few takes of the 3 minutes tune in no time. Although we had a few interesting ideas, after starting the editing process, it just felt flat. All these other ideas then started to flow. I created a quick storyboard in InDesign and worked out scenarios for at least every count of 16, if not, more. It took me no time and, in another week, I had my fellow puppeteer back to video again. This time it was SO much easier to talk about each shot, set it up and shoot. It felt much more organized and allowed the creativity to flow a bit more. While sitting down to edit this time, I knew I had something and the video looks great for a first time puppet shoot. Obviously, story-boarding is a mainstay in the video/film industry for a reason. The initial time it takes to lay it out is SO worth the feeling of being organized and ready for shooting day... but, even the first disorganized shoot was worth it to help understand what I was going for and where I needed to focus my attention. Enjoy the process folks! ... Video coming soon!
Thursday, May 21, 2009
Matt Ficner Workshop
Matt Ficner, of Creepy Puppet fame, lead a puppet making workshop in Ottawa, Canada on May 16 and 17 which I attended. It was a 2-day creative workshop making a hand/rod puppet of your choosing. It was after the weekend that I realized it had also been the anniversary of Jim Henson's passing. What a wonderful way to honor one of my childhood heroes. Matt is an incredibly creative puppet builder and all-around artist. His fun, inventive approach is perfect for learning a new way of puppet building and I came away with fresh ideas and filled with inspiration. Thank you Matt!!! My big furry cat [puppet] is Harvey. Photo by Matt Ficner.

Cheers to my fellow workshop builder Candice and her beautiful puppet Dot. It was a blast to see Harvey and Dot come to life in our two [short] days together.

Three of my original test workshop participants may finally be returning this weekend to work on [hopefully complete] their puppets. Hoping for more progress images. I'm also working on a new, small puppet project that I hope to post soon. The final images from the puppet making workshop I did with the children's museum were also posted to upinarms.biz.
Cheers to my fellow workshop builder Candice and her beautiful puppet Dot. It was a blast to see Harvey and Dot come to life in our two [short] days together.
Three of my original test workshop participants may finally be returning this weekend to work on [hopefully complete] their puppets. Hoping for more progress images. I'm also working on a new, small puppet project that I hope to post soon. The final images from the puppet making workshop I did with the children's museum were also posted to upinarms.biz.
Saturday, March 28, 2009
Website Update
The website for my puppet company Up In Arms has recently been given a fresh look and new logo. Check it out at upinarms.biz
I just completed day 3 of 4 of my puppet making workshop series. It's been very exciting, exhausting and rewarding. It's been a great learning tool for me too - like realizing we could have used more than 4 days. Still, the results are going to be incredible and I can't wait to share the final creations with everyone on my blog and website.
I just completed day 3 of 4 of my puppet making workshop series. It's been very exciting, exhausting and rewarding. It's been a great learning tool for me too - like realizing we could have used more than 4 days. Still, the results are going to be incredible and I can't wait to share the final creations with everyone on my blog and website.
Monday, March 09, 2009
First Test Workshop Successes...
Being generally busy, celebrating occasions with family and friends and a nasty little bout with the flu, kept me from completing the test workshop until yesterday. I didn't get my full 6 test puppet builders back but, I spent a nice early evening with my sister and niece Rachel and nephew Ronny to complete their 2 puppets. Both had chosen the Roly pattern.
After they took their puppets home, they dressed them in some temporary Build-A-Bear costumes but are eager to find some more permanent clothes that match their puppet's personality.
Raul ~ made by Ronny...

Alexandra ~ made by Rachel...

It was a wonderfully rewarding process for all of us. My sister got a big kick out of seeing Alexandra's hair take shape as she helped Rachel through the process.
After they took their puppets home, they dressed them in some temporary Build-A-Bear costumes but are eager to find some more permanent clothes that match their puppet's personality.
Raul ~ made by Ronny...
Alexandra ~ made by Rachel...
It was a wonderfully rewarding process for all of us. My sister got a big kick out of seeing Alexandra's hair take shape as she helped Rachel through the process.
Sunday, February 08, 2009
Creative Process & My Upcoming Workshop

I love the creative process and the evolution of a puppet. I had an idea for some hair on a new puppet that changed into something else and the character started to inform a new direction. I have a spark of an idea and see where it takes me. I wish I could be one of those people who draws a sketch and follows it through to some amazing puppet likeness but, I'm not there yet. I've played around with some different eye shapes [above] for the new character and have revisited it at least 3 times already and feel like I'm closing in on something soon but, I appreciate where the process has taken me and the new things I discover along the way.
My puppets caught the attention of a friend who works for a local children's museum and he asked me to consider doing a workshop with the kids who might be interested in building puppets. With permission to use the Project Puppet Simple Series patterns, I gathered some friends this past weekend [below] to see how much we could get done in a certain amount of time with just me doing the sewing. With six participants in the 'test', they got all of their patterns traced and cut and the head and body sewn. It was enough to gauge how many kids I could handle in the workshop, volunteers needed to assist, additional sewers, etc. The first workshop at the children's museum is scheduled for March 14 and I'm equally nervous and excited.

Sunday, February 01, 2009
The MuppetCast & Sesame Street at 40
Thanks to Steve over at The MuppetCast for the mention on his 1/25/09 show. Steve has been providing a great service with his regular podcast on all things Muppet and is one of the entertaining resources that I regularly turn to.
I attended the Sesame Street at 40 lecture at William Patterson University in Wayne NJ on Friday [Jan. 30]. The whole team did a great job and it was wonderful to see Frank Oz, one of my first puppet heroes, involved with something Muppet-related. The event was moderated by author Michael Davis and included writer/composer Tony Geiss, Bob McGrath, Fran Brill, Marty Robinson, Kevin Clash, Sonia Monzano, Caroll Spinney and Frank Oz. It was cool to hear stories about how they came to Sesame Street in their careers. Who knew Bob had a huge fan following in Japan?? He was quite the famous singer in his earlier days. The best part of the evening was the improvisational conversations with the puppets themselves as they brought out Oscar, Zoe, Telly and Elmo. No matter how old you were in the audience, your inner child was in awe to see these well-known childhood heroes live. Even those of us who are not exactly Elmo's biggest fans, really appreciate how Kevin performs him for the adult set - there's a little more 'knowing' behind that soft, red exterior and Clash is a fantastic performer and puppeteer.
I'm working on my next new puppet. I'm really enjoying the process. You think something is going to go a certain way and when it doesn't, the work takes you in another, interesting direction.
Sunday, January 18, 2009
Geraldine gets some upgrades
First, Geraldine's earrings were from a little girls dress-up set and the plastic clasps did not grasp her ears tight enough and kept falling off while storing her or if she moved around too much. The clasps were removed and where they sat was ground off the back of the earring. I then glued on these great 1/4 inch ProMAG magnets that I found at Michael's [craft shop] and backed her ear with a 2nd magnet. The grip on these little magnets are super tight and I have every confidence they will hold with even the most spastic puppet performance.

Continuing in the spirit of passing along puppet building tips, I should mention I'm a little reserved when it comes to making certain features permanent [ie. glued on] so, when considering how to attach the ribbon in her hair, I found these mini hair clips perfect for gluing the ribbon to first and then clipping into her hair.

Geraldine was in need of a fresher look for her shirt. A friend suggested something in yellow and since I love the contrast of purple and yellow, Geraldine was outfitted with a new yellow shirt with a big, beautiful purple flower on the front.

Continuing in the spirit of passing along puppet building tips, I should mention I'm a little reserved when it comes to making certain features permanent [ie. glued on] so, when considering how to attach the ribbon in her hair, I found these mini hair clips perfect for gluing the ribbon to first and then clipping into her hair.
Geraldine was in need of a fresher look for her shirt. A friend suggested something in yellow and since I love the contrast of purple and yellow, Geraldine was outfitted with a new yellow shirt with a big, beautiful purple flower on the front.
Friday, January 16, 2009
Lone Wolf Tribe Workshop
I recently joined the online puppet community Puppet Hub and came across Lone Wolf Tribe whose website I had seen some time ago and was happy to be re-introduced to their fantastical form of puppetry. I noticed they were giving workshops on foam sculpting the puppet head and quickly signed up for their class this past Wednesday, January 14 at their Brooklyn, NY studio.
I had such a great time learning a new, creative process. Kevin Augustine, Lone Wolf Tribe's artistic director, is an encouraging and inspiring teacher. As someone who can get a little too precious about my own creative process, it was nice to let go a little more and still be impressed with the outcome. Starting with a simple sketch or idea, you draw the image to a large block of upholstery foam. The face front and profile were drawn to the appropriate sides and used as guides. Much slicing and carving later reveals a pretty cool puppet head. Although my figure looked to be more Native American or African, his name came to me as 'Boris'.

If you are looking to learn new technique or would just like to get your craft on for an evening or afternoon, I highly recommend this workshop. Lone Wolf Tribe stages fascinating, avant-garde puppet/ theatrical shows. Check out their website for upcoming shows in the New York area or see them at this year's National Puppetry Festival in Atlanta.
I had such a great time learning a new, creative process. Kevin Augustine, Lone Wolf Tribe's artistic director, is an encouraging and inspiring teacher. As someone who can get a little too precious about my own creative process, it was nice to let go a little more and still be impressed with the outcome. Starting with a simple sketch or idea, you draw the image to a large block of upholstery foam. The face front and profile were drawn to the appropriate sides and used as guides. Much slicing and carving later reveals a pretty cool puppet head. Although my figure looked to be more Native American or African, his name came to me as 'Boris'.
If you are looking to learn new technique or would just like to get your craft on for an evening or afternoon, I highly recommend this workshop. Lone Wolf Tribe stages fascinating, avant-garde puppet/ theatrical shows. Check out their website for upcoming shows in the New York area or see them at this year's National Puppetry Festival in Atlanta.
Sunday, January 11, 2009
New Puppet Build ~ Geraldine
Over the last couple of weekends, I worked on my new puppet Geraldine. I had fun with the hair and found some great costume pieces to complete her look. She's a girly girl who loves the color purple. I'm thrilled with the way she turned out. She was made from the Project Puppet simple series pinhead pattern.


Thursday, December 18, 2008
New Puppet Build ~ Gustavo

In all, I was very satisfied with this build. I think the character is adorable. He reminds me of a relative of The Muppet's Scooter which I love since Scooter was one of my favorites.
I'm always looking to improve my puppet building skills so, any advice is welcome. I machine sewed most of the pattern but, followed instructions to whip stitch the mouth which left very visible stitching. Maybe I should have machine sewed [?] maybe I need better skills [?]
Gustavo was made from the Project Puppet simple series melonhead pattern.


Sunday, December 17, 2006
Holiday Performance
I helped out a friend today with a holiday show in which I performed Kugel the mouse [puppet] and Maury the Menorah [animatronic]. It's been a LONG time since I've performed a puppet for a show and I have to say, it felt great. I loved getting into character and, even more so, loved the cheers and screams of delight of all the kids enjoying the show. I wish I had photos to share.
Hope this is the start of something new and exciting for the new year.
Hope this is the start of something new and exciting for the new year.
Thursday, June 15, 2006
Project Puppet adds Benny!

Some slightly older news... Project Puppet recently added my puppet Benny to their puppet gallery. His bio and pics can be seen here.
Tuesday, May 16, 2006
Puppet Making Basics with Project Puppet
In my quest to make my first Puppet, I was lucky to come across projetpuppet.com. While sifting through the various methods of acquiring puppet making skills, Project Puppet seemed to be the easiest of places to start. They supply all your patterns and instructions so, suffice it to say, I will go over my experience in more general terms and let you in on my own mistakes and inspired moments that helped me along the way. First and foremost... READ. Read up on anything you can on puppet making to understand what goes into making a good quality puppet if that's your goal. The Puppeteers Unite Blog has one of the most extensive lists of puppet links out there. It also helps to have some basic sewing skills; a sewing machine helps things along too and buying a glue gun is a good investment as well.

When you get your pattern, you should adhere it to some poster board and cut out the individual shapes. First cut the rough shape of the piece and then tack it down. When I first started cutting up my pattern, I used a glue stick to adhere my first piece. Tip ONE - DON'T do that! It was just a tad messy and the glue can clump under the paper pattern. I switched to double sided tape and it was smooth sailing from there. Cutting the pattern and then the materials are the most time consuming parts of this [and any] puppet making project.

I didn't know if I would be able to make a decent enough puppet so, I went the low-rent route and purchased foam and fleece from a fabric store. Again - READ - and remember the terms 'Reticulated Foam' [sold on Project Puppet] and Antron Fleece. More on that later. You might be surprised as I was that the head [above] was just one piece of foam. The pattern suggests using a firm material such as cardboard or foam core for the mouth plate. I thought I would use the play foam stuff that you get at craft stores. First building mistake. The craft foam doesn't hold it's own as well and when it gives to any pressure, you might lose some of the integrity of the mouth. Something more sturdy will also help hold the shape of the head. The pattern is also made so that you can improvise. The head on the right is shown with the foam neck strip in place. A neck hole template is included to cut out where your hand enters. It fit snug around the sides of my hand and without the body, it felt ok. After completion, it becomes a little bothersome and I realize I should have cut the hole bigger so my hand can glide in and out without anything 'grabbing' at my hand in attempts to operate the mouth. I also like the method of joining the back/ inside of the mouth plates with one piece of fabric as outlined by the Foam Book. I employed that method with my puppet. The mouth is lined in front with black felt and ready for the next step.

As I mentioned, I used a basic fabric store fleece. I can definitely see how this material has started to look 'worked' from beginning to the end of the project. I imagine you could get better results with a stronger no-pill fleece or just go the pro route and get the Antron fleece. Above is the puppet covered in fleece next to his foam body. The fleece head covering was sewn to a neck sleeve which will be sewn inside the body after the body gets a fleece covering of it's own.

The figure above on the left shows the puppet nearing completion and just trying on his wig. I modified the fleece covering pattern for the head to design how I would cut the hair fabric. This was a great silky fleece 'fur/ hair' that's in many of the retail fabric stores. There is a hand pattern separate from the arm pattern in case you are making your puppet with a foam exterior [foam head & hands]. Since I had decided on the fleece, I modified the hand pattern with the arm pattern to make one hand/arm pattern. After stuffing the hand & arms with poly-fill, I sewed a little elbow to keep the arm articulated. Another thing I learned from reading up on puppet making - if your arm doesn't bend, you've limited the ability for your puppet to perform. The figure on the right shows how you can start adding character. I chose a ping pong ball with about 1/4 of it cut off. It was covered in fleece and glued to the face. The ears were a simple pattern of my own making, stuffed with poly fill and glued to the sides of the head. I used the hair/ wig to spot where they would be placed.

I also used ping pong balls for the eyes... cut in half with a razor and small scissors. A small bit of fabric was glued down part of the eye to simulate the eye-lid and glued around to the back to give it a smooth appearance. I've seen a lot of puppets made with black felt circles and I didn't trust myself enough to cut perfect circles out of fabric. I found the perfect solution in the wiggle eyes from the craft store. I used the 24mm size [left image] and clipped a couple of them open to use their perfect black discs. I only placed the eyes and unattached discs on the face and took a picture. I actually opened the image in Photoshop first, placed the black disc on a new layer and moved it around with a duplicate pupil to see what my best placement would be before committing to gluing it all down.

Eyebrows and a tongue were cut from felt and glued in place. A small piece of the hair fabric was cut to fashion a goatee. Some sources say you shouldn't name your puppet until it's complete. I had a couple names in mind for the type of character I wanted to do and when I saw him complete for the first time, his name came to me.... Benny [his friends call him Ben.] For the final touch, I went shopping for Benny's shirt. There's always kids clothes on clearance somewhere and this XS [4-5] plaid button down from Old Navy was the perfect fit. Last tip - if you want your puppet to have a crisp look, don't shop in second-hand stores for 'slightly worn' clothes. You can tell they're second-hand. You worked this hard, your puppet deserves to look their best... or, if you have enough energy left, make an original costume of your own. I imagine Benny is the type of guy who would have a loving companion [a dog] so, I've got a lot to plan. PEACE!
Thursday, May 11, 2006

Monday, May 08, 2006
Welcome
Welcome to Puppet Muse. I'm on a journey to produce puppetry and I found a lot of inspiration while creating my first puppet. I was encouraged by a friend to have a forum where I could post my progress in both creating puppets and producing puppet-based shows. When I was 10 years old, I was a staunch Muppet fan and was convinced I was going to be a master puppeteer. I've since performed in theatre, produced theatrical shows, shot some artistic photography, recorded a couple of CDs and have now returned to my childhood passion of puppetry.
However you came to my blog, thanks for joining in on the journey.
However you came to my blog, thanks for joining in on the journey.
Subscribe to:
Posts (Atom)